Rya Rug Stitching Instructions
The Finnish Rya is made of knotted wool(with about a 1 – 1.5 inch pile), tied to a handwoven fabric backing. The special rya backing is woven using linen warp and wool weft. The backing is woven with spacing to allow the rya knots to be tied or sewn in.

Some shifting of the weft threads may occur during shipping and handling. The spacing can be gently pushed back into place before starting a row of knots.
The Rya knot is formed around 2 warp threads. The warp threads are the linen yarn threads that run vertically in the fabric.
To make the Rya knots, use 2 or 3 strands of yarn.
Length about 1.5 – 2 yards.
Thread them onto a needle provided with the kit
2 strands creates a rya that will lay fairly flat
3 strands creates a rya that has quite a dense pile
Sufficient yarn is provided for either style of rya.
You may work the knots from either the right or the left of the fabric.
I find it best to start from the bottom of the design and work your way up to the top.
Centre the design on the fabric.
To Sew the Knots

Start from the inside of the group of 2 warp threads
(Working from left to right:
Pull the yarn through and up to the left.
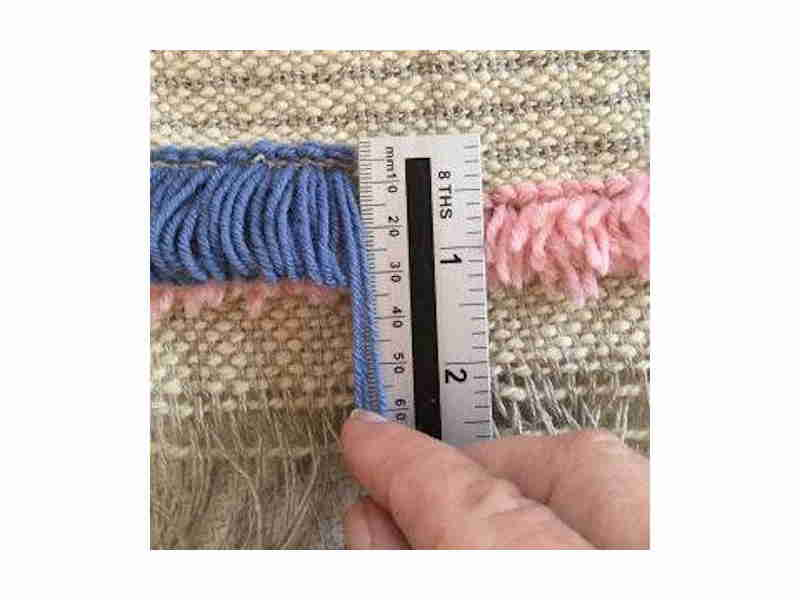
Hold back about an inch of yarn( the length of the wooden ruler provided)
This forms the first part of the knot.

Thread the needle through the next warp thread
from the outside to the inside of this group of 2 warp threads.

Tighten up the loop that has formed around the 2 warp threads.

Wrap the thread around the ruler.
This forms the Rya loop.
Repeat the above procedure for the required number of knots in the design, leaving the knots on the ruler as you work your way across the fabric.
When the ruler fills up, or you are starting a new colour, the ruler can be moved and the process repeated.
When you have a full row of knots, give them a gentle tug to tighten them securely to the backing, before starting the following row.
After you have tied a row of loops, the knots can be cut to form the pile.
Using the ruler as a guide, trim the knots carefully.
Once the Rya project is finished, allow the yarns to settle for a few days, then trim again to get an even pile.
PLEASE NOTE:
These “Rya Rugs” are designed to be hung on a wall as a piece of art. Using a Rya as floor or area rug is not recommended.
Sadly, over the years I have received many emails from rya rug owners, asking how to repair the hole in their rug that was created by a table or chair leg. A repair is possible sometimes, but this should not have happened. Ryas are traditionally used as a bed covering or a wall hanging. A Rya should be treated as a treasured piece of art, hung on the wall, not on the floor and can last for a lifetime when cared for properly.
More about How to Make a Rya Rug
How to Stitch a Rya Rug
How to Weave Rya Rug Backing
Rya Rug Yarn Calculations
How to Stitch a Rya Rug – YouTube
Rya Rugs
Rya Rug – Hameenlinna 1711
History of the Rya Rug
Finnish Rya Rugs
Rya Rug Repair
Hemp Rya Tapestry
Rya Rug Video
Rya Rug Backing and Rya Kits
Paivatar Yarns Bespoke Rya Rugs
How to Tie a Rya Rug Knot – YouTube Video
Rya Rugs
History of the Rya Rug
Finnish Rya Rugs
Rya Rug Repair
Hemp Rya Tapestry
Rya Rug Video
Rya Rug Backing and Rya Kits
Paivatar Yarns Bespoke Rya Rugs
Rya Rug Tapestry Books
The Ryijy-Rug Lives On Finnish Ryijy-Rugs 1778 – 2008. Book by Tuomas Sopanen, Leena Willberg
Hand-made C.U.M. Rya Rugs
Techniques of Rya Knotting
Hooked rugs & ryas;: Designing patterns and applying techniques
Handgenoopte C.U.M. Rya Tapijten
Rya Rugs – Design and Make Your Own by Melinda Byrd Byrdcall Studio
PAIVATAR YARNS
Shop for Handspun yarns, Natural Plant Dyed Yarns, and supplies for Nalbinding, Embroidery, Sámi Band Weaving and Natural Dyes
at Paivatar Yarns Web Shop.
 LONGTHREAD MEDIA VIDEO
 LONGTHREAD MEDIA SUBSCRIPTIONS
HANDWOVEN MAGAZINE
PIECEWORK MAGAZINE
SPINOFF MAGAZINE
LEARN LONGTHREAD MEDIA
PAIVATAR HANDMADE
 Paivatar on YouTube
Visit my YouTube channel for how-to craft videos.
Or Please visit my Channel on Rumble for more how-to videos.
https://rumble.com/Paivatar
LIVE STREAMS - Paivatar Studio
KICK
TWITCH MAKERS&CRAFTING
YOUTUBE
Categories: HAND WEAVING, Rug Weaving, RYA RUG Weaving, Weaving Patterns
